

Administration support
Quick guide for Terveystalo Leo administrators
In this video, we provide guidance on using the administrator features in Terveystalo Leo. The video covers the configuration of organisation settings, including defining alert rules for absences, managing work ability support cases and creating a work ability plan. It also demonstrates user management features, defining roles and access rights, and configuring email settings and data deletion settings. The video provides a comprehensive overview of how an organisation can customise the platform to meet its needs and effectively implement the early support model.
Managing access rights and roles
Everything related to roles, users and organisations is managed by going to the Settings menu and selecting User Management.
Roles and access rights
Roles are managed at the organisation level, which means that the same role can have different access rights and notification settings in different organisations within the customer account. The organisation's administrator can view the access rights defined for roles, assign roles to users and edit subscriptions associated with roles (email notifications). The following table describes the roles available in the system and their access rights.
In addition, each employee added to the system is automatically assigned the “Employee” role. This role does not grant access to any system features.
The supervisor role differs from the other roles in two ways:
- Users cannot be assigned to this role directly via the Roles page.
- The supervisor role is assigned automatically based on the personnel data provided by the organisation. When a user is specified as having direct reports in the personnel data, the supervisor role is activated.
The roles of occupational health professionals (occupational health nurse, occupational health physician) are assigned automatically based on the access rights set in the patient information system. Professionals only have access to employees associated with the company and location assigned to them.
Users
On the Users tab, you can view all users in the organisations associated with the customer account.
Note! Users are updated automatically based on the personnel data provided by the organisation. Therefore, any changes to user information must always be made in the personnel data rather than on the Users tab. The personnel data serves as the primary master data and will overwrite any changes made manually. The only exception is users whose information is not updated through the personnel data (e.g. external payroll administration).
There are 3 tabs in the user view
Active users
The employment start date is in the past, and no employment end date has been set or the end date is in the future.
Inactive users
The user has been created, but the employment start date is in the future.
Deleted users
The employment end date is in the past.
User page tabs
-
Profile information
Basic user information, such as personal details, contact information, and the employment start and end dates.
-
Employment
On this page, you can view the organisational groups the employee belongs to (e.g. department, cost centre). You can also view the user's supervisors and direct reports. Access rights and notifications associated with the supervisor role are applied to users who have direct reports on this page.
-
Access rights
You can view a more detailed breakdown of the access rights granted to the user.
-
Notifications
You can view which email notifications the user receives. You can also see who receives notifications concerning this employee.
Deleted users are divided into two statuses:
- Quarantine: A user is moved to quarantine when their employment ends. Users remain on this page for 30 days, during which they can be restored to active status without any loss of data.
- Deleted: After 30 days, users are deleted once the data retention period has expired.
To filter the user list in more detail, you must first select an organisation from the organisation menu. You can then use organisation-specific filters (e.g. department, cost centre). You can also search for a specific user by name, email address or personal identity code. The filters or searches you use are retained until a new search or filter is applied.
Adding and removing rules
- Adding a new rule: Select a category, fill in the required fields and click Save. The rule takes effect immediately. However, the rule does not affect past work ability support cases, only new ones.
- Removing a rule: Existing rules are listed under their respective categories. You can remove a rule by clicking the trash can icon on the right-hand side of the row.
Organisation
On the Organisation tab, you can view the organisational structure by department, cost centre, personnel group and other identifiers. The information is updated automatically based on the personnel and organisational data provided by your organisation.
-
How can a Work Ability Partner support your organisation?
A Work Ability Partner provides practical support in day-to-day work to help identify work ability risks at an early stage and find solutions in a timely manner. Work Ability Partner Riia Astola-Pöllänen explains what the role involves in practice and in which situations it can be most beneficial.

Payroll administration
Payroll administration view
The payroll administration view is designed to streamline payroll processes related to the handling of long-term absences and sickness absence certificates. It serves as a centralised digital archive for all sickness absence certificates stored in the system.
Roles and access rights
A separate Payroll Administration role can be defined on the platform. This role allows the user to view only information relevant to payroll processing (sickness absence certificates). The role does not provide access to other system functionalities, such as managing work ability support cases and reporting.
Key functionalities
In the payroll administration view, you can:
- Receive information about new sickness absence certificates without delay. For example, certificates transferred directly from Terveystalo's patient information system are available to payroll administration immediately after the appointment. Payroll administration users can also choose to receive an email notification when new certificates are transferred.
- Search for and view all sickness absence certificates stored on the platform, as well as related diagnosis codes, absence types (including accidents) and absence periods
- Download sickness absence certificates if they need to be submitted, for example, to Kela
- Track the processing status of certificates



Alert rules
The video provides guidance on configuring alert rules. Alert rules determine when an absence triggers an alert for a supervisor or HR and when a work ability support case is initiated. Three different types of absence rules can be defined in the system: recurring absences within a specified number of months, the duration of consecutive absences, and the total number of absence days within a selected period. For consecutive absences, you can also define the required number of absence-free days between absences.
Alert thresholds and identifying work ability risks
Alert rules are a key part of the early support model. When an employee's absences exceed the threshold defined for the organisation, the system triggers an alert and automatically creates a new work ability support case for HR/a supervisor to handle.
You can edit the rules by navigating to Configure services and selecting the Alert rule settings tab. First, select the organisation whose settings you want to view or edit from the drop-down menu. Alert rules must be set separately for each organisation.
Note: Alert rules only respond to absences that pose a work ability risk (such as sickness absences and accidents).
Types of alert rules
You can create alert rules in three different categories according to your needs:



Work ability support case settings
The video provides guidance on how to create a preventive tool for the early management of employee absences. It covers selecting initiation rules, defining alert rules and building an action plan to meet the organisation’s needs. The video presents predefined actions and provides guidance on creating a customised plan. It also covers linking actions to alert rules, setting time limits, defining documentation requirements and adding subtasks to provide further guidance.
Work ability support case settings
The organisation can set a default work ability plan for new work ability support cases. This can be done in the settings under ”Product packages and services” → ”Work ability support case settings”. The defined work ability plan will apply to all new cases. However, cases that are already in progress will remain unchanged.
Initiation rules
Under Initiation rules, you can define which alert rules will initiate a new work ability support case. We typically recommend selecting all alerts configured by the organisation.
Actions
The Actions section defines the actual work ability plan and the related actions and tasks. The organisation can define its own plan or use the predefined actions suggested by Terveystalo, which are based on the 30-, 60- and 90-day alert rules in accordance with Kela's thresholds. You can add a new action by clicking the ”Add action” button.
From the Action type menu, you can select the action to be carried out as part of the work ability plan. You can also choose whether the action is linked to a specific alert rule (e.g. 30 days of absence within 12 months) or whether the action should be carried out on a specific day after a new case is initiated.
If an employee has a reported absence that continues into the future and exceeds the defined alert threshold, the due date is calculated as soon as the absence is received by the platform, but the action does not become due until the alert threshold is actually exceeded.
If the action is not linked to an alert rule but is instead scheduled for a specific day after the start of the case, the due date is set to the day defined in the plan (e.g. 7 days after the start of the case).
If completing the action requires documentation to be added (e.g. an early support discussion), enable “Documentation must be attached to the action” to make it mandatory.
Finally, you can add a more detailed description of the action and the tasks required to complete it. Adding tasks is not mandatory, but they can be used to provide more guidance within the plan. You can also add language versions for the action and tasks.
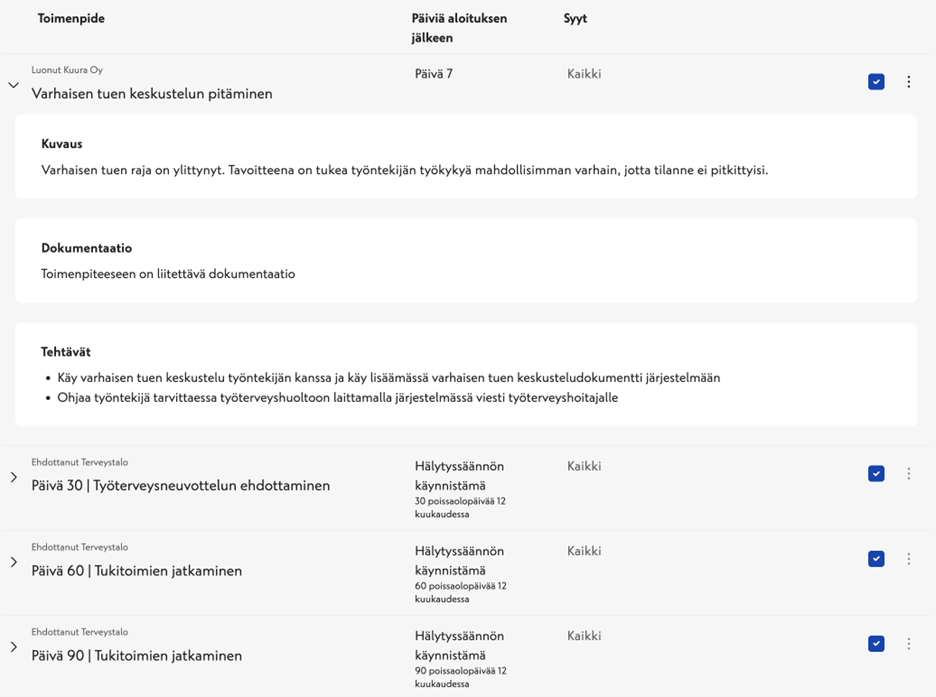
Below is an example of a work ability support plan in which:
- An early support discussion must always be held within one week of the start of a new case, regardless of the reason for initiating the case.
- The alert rules for 30 days of absence within 12 months, 60 days of absence within 12 months and 90 days of absence within 12 months each have their own associated actions, which are activated when the respective alert rules are triggered. (These actions are suggested by Terveystalo and can easily be enabled by selecting the checkbox on the right.).
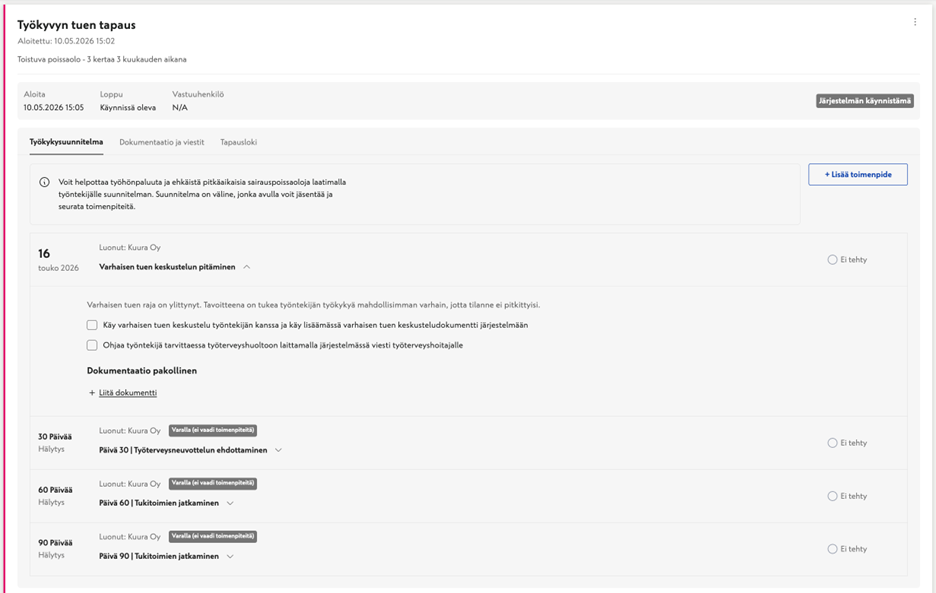
On the employee card, the plan is displayed as follows:
- As soon as the case is initiated, holding an early support discussion appears as an active task with a due date (the due date is 7 days after the start of the case).
- Other planned tasks (those linked to the 30-, 60- and 90-day alert thresholds) are also shown in the plan, but they are not activated until the respective alert thresholds are triggered. Therefore, they do not yet have a due date in the plan. These tasks do not require any action from the supervisor.

Work ability management notifications (Inbox)
Work ability management notifications (Inbox)
The Inbox, located at the bottom of the main menu, contains all email notifications sent by the platform. The Inbox is divided into two tabs: My events and My subscriptions. A red dot displayed on the icon indicates new events or subscriptions.
- My events: Contains messages and comments received on the platform that are addressed to the user.
- My subscriptions: Contains other notifications subscribed to by the user, such as information about new cases, absences or sickness absence certificates.

Emails
Emails
On this page, you can manage the settings related to each organisation's email templates. The page is divided into three sections:
- Language: Select the language in which emails are sent to users who have subscribed to notifications. We recommend selecting the organisation's official language.
- Employee information: Select the employee information to be displayed in email notifications.
- Customise emails sent to supervisors and subscribers: You can edit the template for each email sent from the platform. You can view the current email template and the organisation-specific customisation options by clicking ”Edit template”.
Editing emails:
- Edit multiple: Here you can add organisation-specific text and links to multiple emails at once. You can then select which emails will include this information.
- Edit an individual message: You can add organisation-specific text or links to a specific email. Links are displayed as buttons in the email.
- Send a test: You can send the selected email as a test message to your own email address by clicking ”Send test email”.
Data deletion
Instructions on how to configure data deletion settings in the organisation settings. The settings can be defined separately for active and terminated employment relationships and are configured by data type. The retention period can be selected from predefined options (1–3 years) or a custom value can be entered in months. If the settings are not defined, the data will be retained for the entire duration of the employment relationship. We recommend always setting a specific retention period to avoid unnecessary retention of data.
-

Active employees
You can define how long the platform retains data relating to active employees. The retention period can be set between 12 and 120 months (10 years) and is calculated from the date the data was stored.
-

Terminated employment relationships
You can define how long the platform retains data relating to employees whose employment has ended. The retention period can be set between 0 and 120 months (10 years) from the date the data was stored. Data deletion runs are performed automatically on a daily basis.